
Join the Joey'z Family!

Before you even think about unrolling that tape measure, let's talk prep. Getting this part right is the difference between curtains that look professionally hung and ones that just look... off. Think of it as your mission briefing before the main event of learning how to measure windows for curtains.
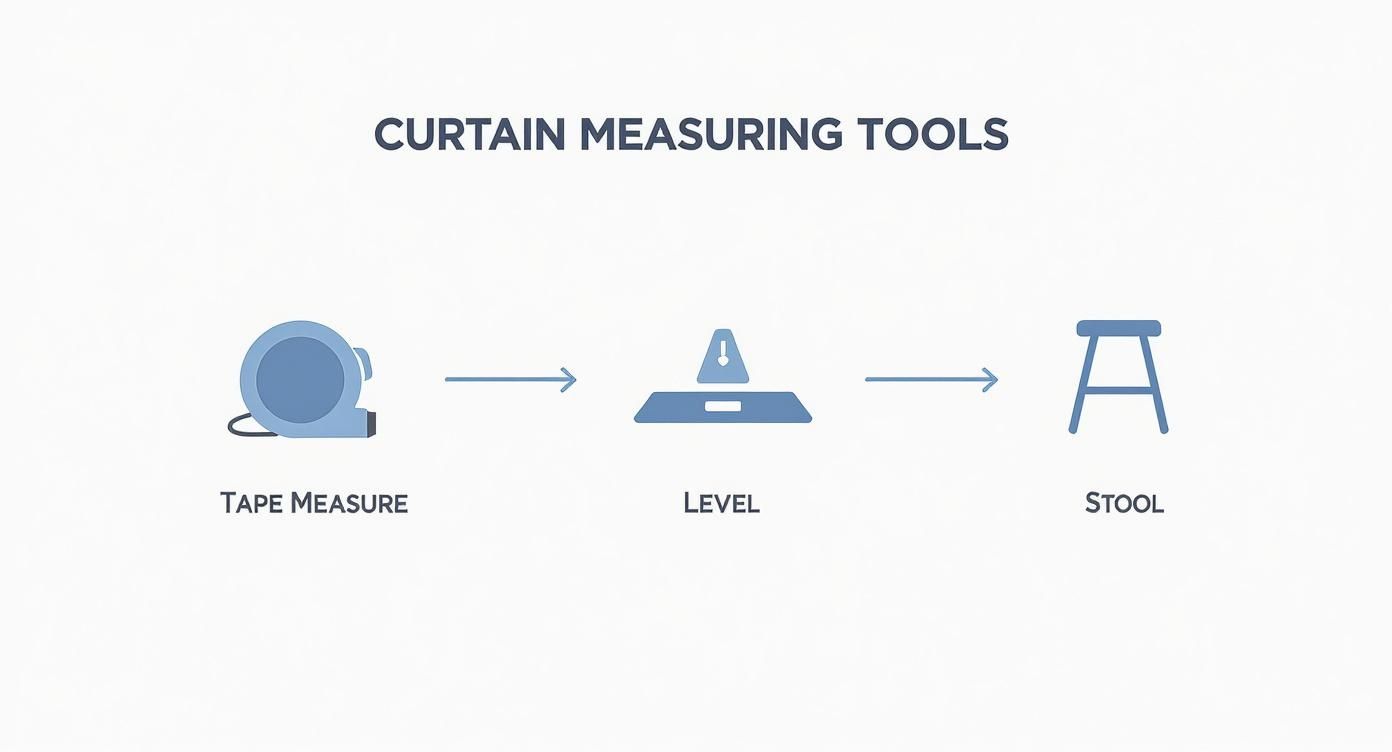
The secret to perfectly measured windows isn't just about the window itself. It’s about having the right gear and knowing the lingo before you start. This foundational knowledge is what prevents common, frustrating mistakes.
You wouldn’t bake a cake without measuring cups, and the same idea applies here. Without a few simple items, you're essentially just guessing, which can lead to costly curtain returns or a finished look you’re not happy with.
Gather these essentials before you start to ensure your process is smooth and your numbers are accurate. Having them on hand means no interruptions and a much more efficient workflow.
| Tool | Why It's Critical for Accuracy |
|---|---|
| Metal Tape Measure | Fabric or soft tapes can stretch, giving you wonky numbers. A sturdy metal tape is non-negotiable for precision. |
| Pencil and Paper | Don't trust your memory. Jot down every measurement as you take it. A quick sketch of the window helps keep it all straight. |
| Sturdy Step Stool | Reaching the top of the window frame safely is crucial for getting an accurate height measurement without any guesswork. |
| A Level | This little tool is your best friend for making sure the curtain rod is perfectly horizontal. Nothing screams DIY-gone-wrong like a crooked rod. |
Having these items ready to go makes the entire process smoother and far more accurate.
The world of window treatments has its own language, and knowing a few key terms will help you follow instructions. As the global window coverings market grows—it's projected to hit $60.16 billion by 2030—so does the variety of styles and terms you'll run into. You can read more about the trends driving this growth on Grand View Research.
Key Takeaway: Mastering terms like 'stack back' and 'return' empowers you to plan your window treatment with intention, not just accuracy. This is how you achieve a truly custom and polished look.
For instance, "puddling" is a term for curtains that are intentionally long and pool on the floor for a dramatic, luxurious effect. Knowing this helps you determine the right length, a topic we dive deep into in our complete guide to curtain lengths.
Alright, with your tools in hand, it's time to capture the two measurements that will make or break your curtain project. Getting the width and length right is the foundation of a great-looking window treatment. These numbers decide everything.
Remember, we're not just measuring the glass—we're thinking about how the curtains will actually live and breathe in your space.
A common rookie mistake is measuring only from one edge of the window frame to the other. To get that polished, professional look, you must account for stack back. This is simply the space your curtains take up on the wall when they're pushed all the way open.
The short answer is: mount your curtain rod about 3 to 6 inches outside the window frame on each side. So, if your window frame is 50 inches wide, your curtain rod should be at least 56 to 62 inches long.
This extra breathing room lets the curtains pull completely clear of the glass when they’re open. It’s a simple trick that maximizes natural light and even makes the window feel bigger and more intentional. For a really dramatic statement, you can push that measurement out even further.
To nail down the perfect panel width, you also have to consider fullness—that's what gives curtains their lovely, rich folds. Don't worry, the math is simple. If you need a little help with the numbers, our handy curtain width calculator takes all the guesswork out of it.
Next is the length, and this is where personal style really comes into play. You’ll start your measurement from where you plan to hang the rod—ideally 4 to 6 inches above the window frame—and measure down to where you want the curtains to end. Hanging the rod higher is another designer secret; it draws the eye upward and creates an illusion of height, making the whole room feel more spacious.
You generally have three classic curtain lengths to choose from:
Pro Tip: If you have uneven floors, which is common in older homes, make sure to measure the length on both the left and right sides of the window. For a "float" or "kiss" style, always use the shorter of the two measurements. This will prevent one side from awkwardly dragging on the floor.
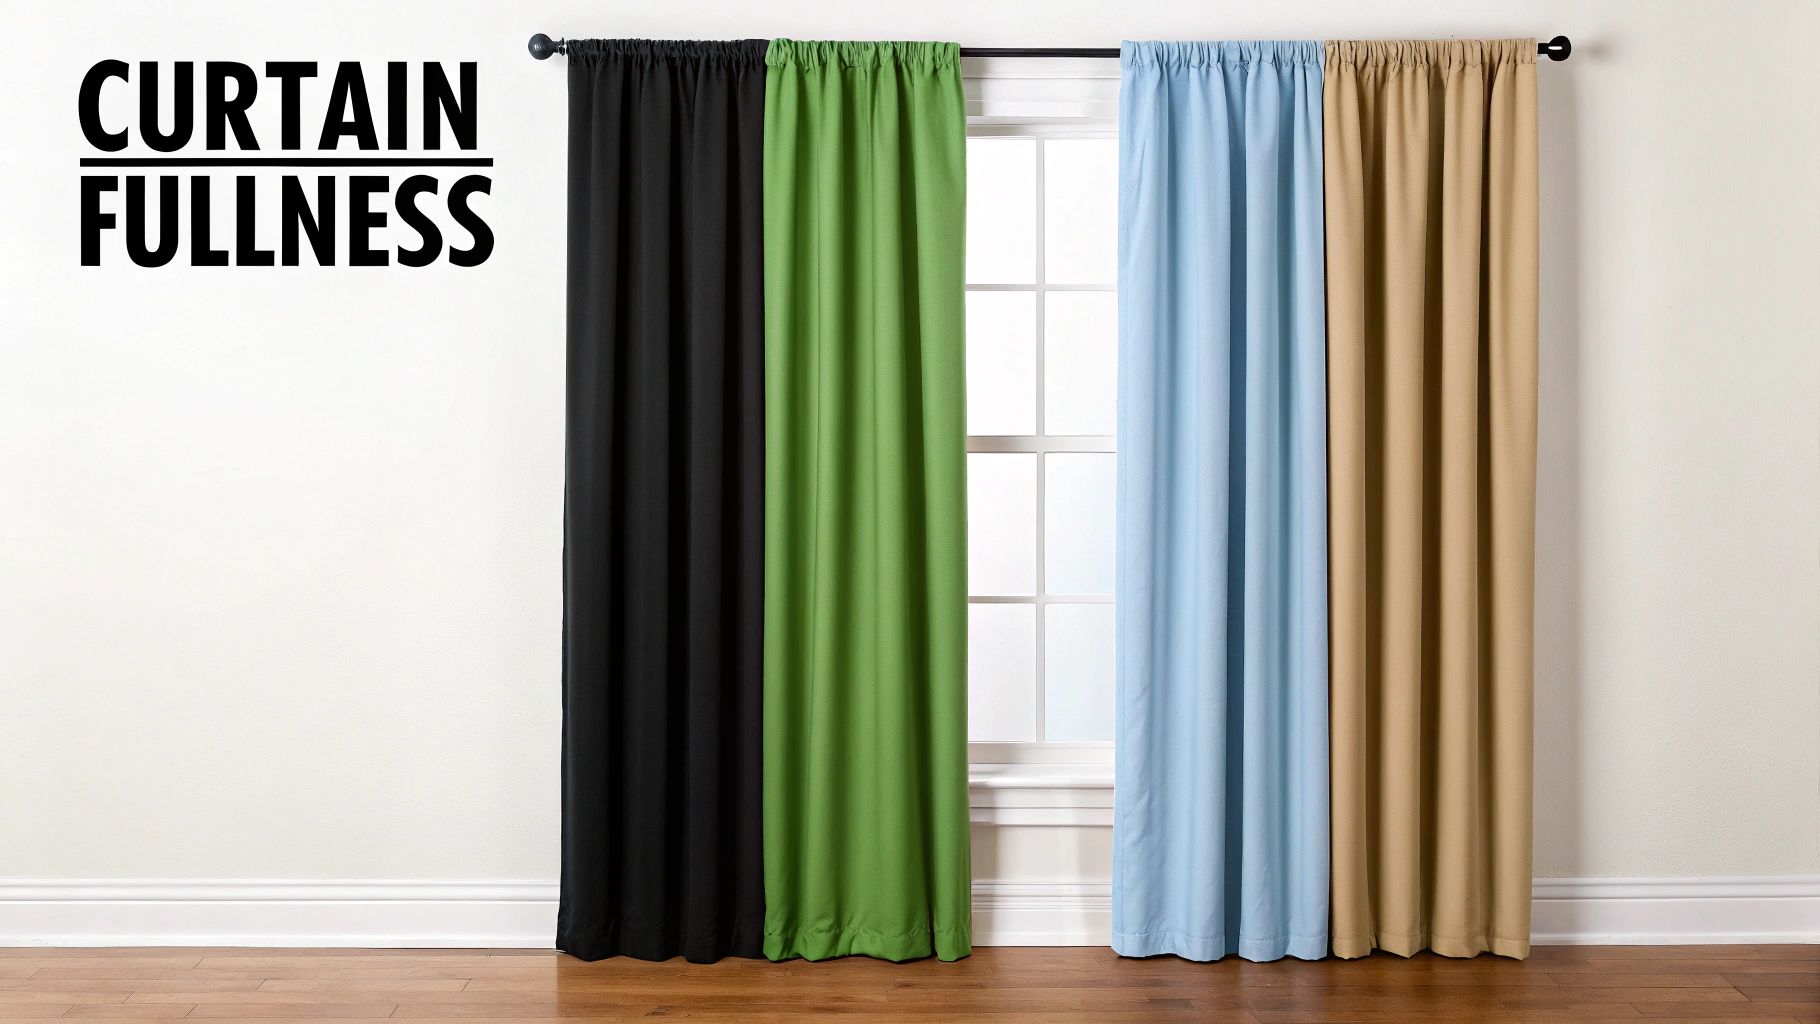
Alright, you've got your numbers. Now for the fun part: turning those raw measurements into a stunning, finished look. This is where we talk about fullness—the secret ingredient that gives curtains their beautiful, flowing character.
Fullness is simply the extra fabric you add to create those lovely folds and pleats. It’s usually expressed as a multiple of your curtain rod's width. Without it, your curtains would just look like a flat, sad sheet hanging in the window.
Most designers, myself included, will tell you to aim for a fullness ratio of at least 2x the curtain rod width. Anything less, and you risk that limp, unfinished appearance.
Let's make this simple. If your curtain rod measures 60 inches across, you’ll want curtain panels that total at least 120 inches in width for a standard 2x fullness. This gives you enough fabric for balanced folds that look intentional and lush.
The ideal ratio really depends on the fabric and the vibe you're going for.
A quick word of caution: fabric weight is a huge factor. Heavier materials hang very differently and can look stiff or awkward if you go overboard with fullness. Lighter fabrics like linen and voile, on the other hand, need that extra width to create an airy, full effect.
Your fabric choice doesn't just impact the look; it also fine-tunes your measurements. Sheer fabrics, for instance, often need a bit more overlap in the center to maintain privacy and block light effectively. Blackout fabrics are the opposite—you want just enough width to avoid unnecessary bulk.
Here’s a quick reference I use all the time:
| Fabric Type | Recommended Fullness |
|---|---|
| Sheers | 3x rod width |
| Linen | 2.5x rod width |
| Blackout | 2x rod width |
The heading style—how the curtain attaches to the rod—also plays a role in your final measurements. Grommet headings, like you’ll find on many of our grommet curtains, create wide, even folds and require about 1 inch of extra space for each ring. Pinch pleats, which use tape on the back, add about 1.5 inches of depth per pleat, creating a more traditional, tailored look.
Key Insight: Thinking about fullness and heading style from the start is what separates a generic window treatment from one that looks truly custom and professionally designed.
Let’s look at a real-world example. Abigail measured her living room rod at 84 inches. She wanted a dreamy, ethereal feel, so she ordered sheers with a total width of 252 inches. That 3x ratio, combined with an eyelet ring heading, gave her windows an elegant, gallery-style cascade of fabric.
It's this attention to detail that's driving the window treatment market, which hit $17.2 billion in 2023 and is expected to reach $36.5 billion by 2033. That's a 7.9% CAGR! People are realizing how much of an impact the right curtains can make. (Read more about these market findings on DataHorizzonResearch).
With your precise measurements and this new knowledge, you’re ready to pick panels that not only fit perfectly but also flatter every single window in your home.
Let’s see how this works in a few different scenarios.
For his guest bedroom, Michael wanted a crisp, hotel-like feel that completely blocked out light. He went with 2x fullness blackout curtains with a classic pinch pleat heading. The result? A sharp, tailored look that’s as functional as it is stylish.
In her bohemian-inspired living room, Sara wanted something more relaxed and flowing. She chose linen panels at a 2.5x fullness ratio, achieving a beautiful cascading drape that feels both casual and chic.
Here are a few more ideas to get you started:
As you can see, tweaking the fullness and heading style allows you to tailor the final look to your personal aesthetic and the room's function. Go ahead and create that perfect custom finish.
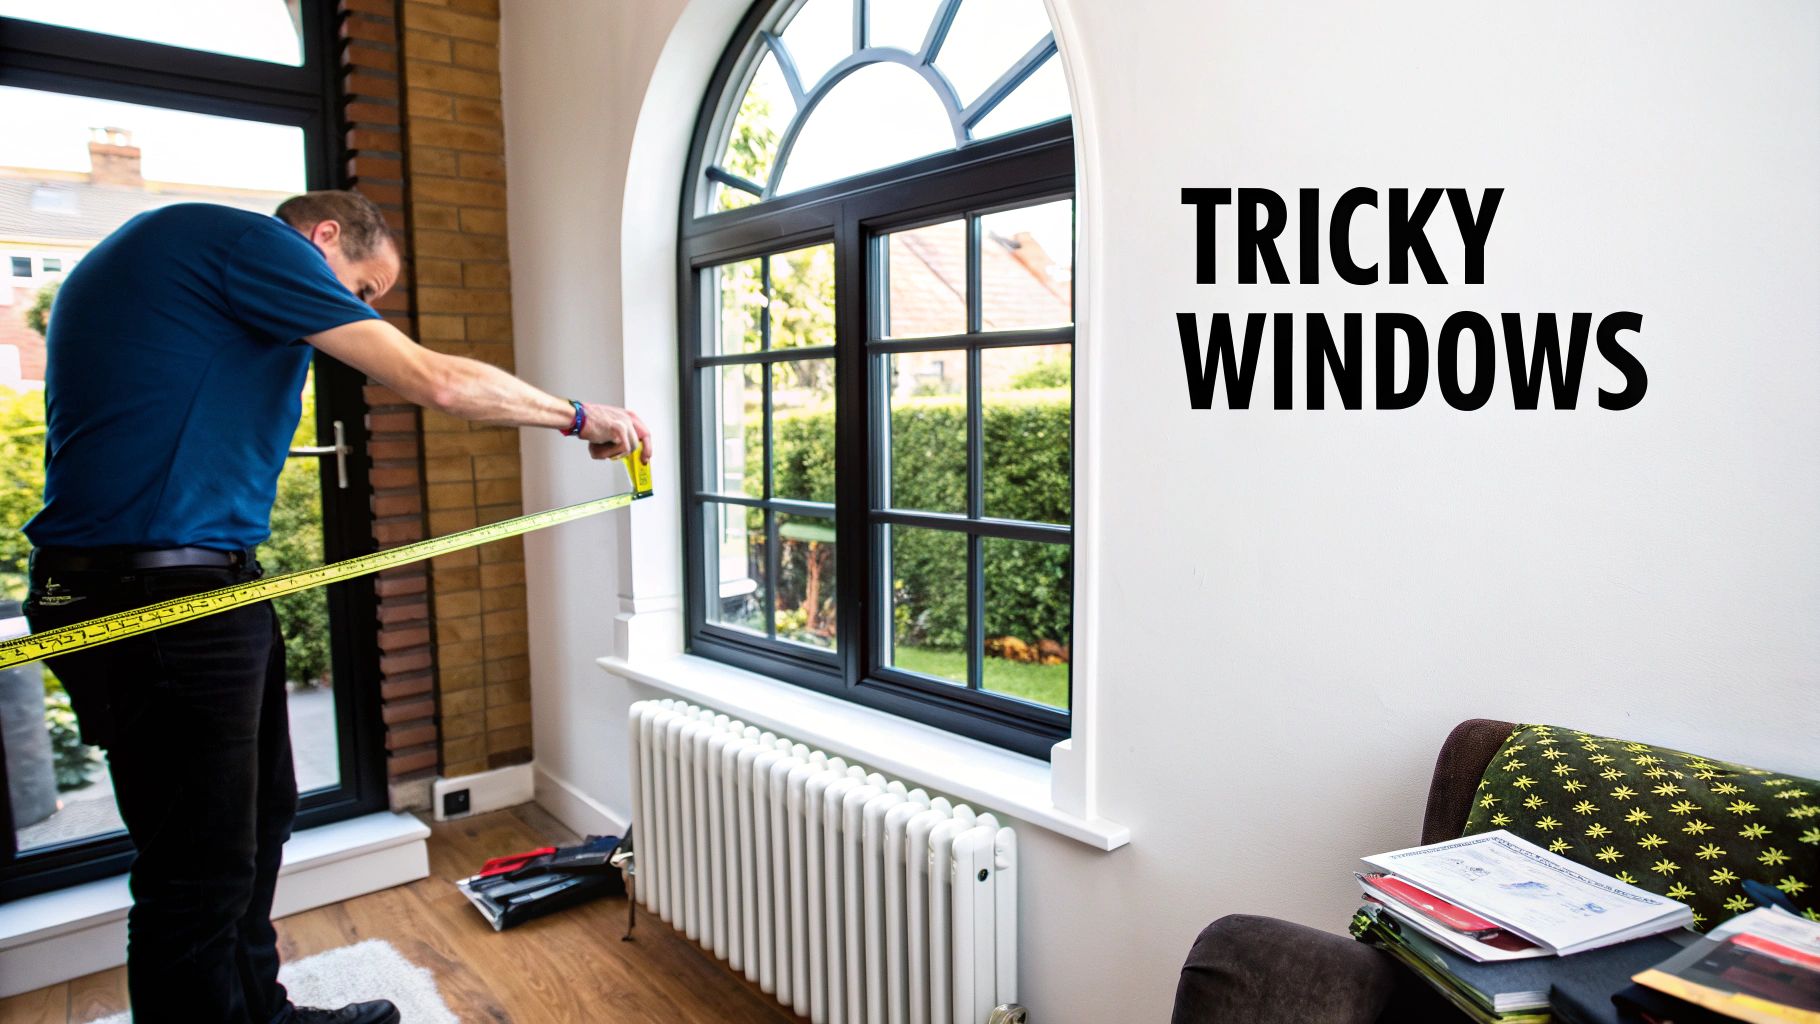
Standard rectangular windows are pretty straightforward, but what happens when your home throws you a curveball? Real-world obstacles like radiators, bulky sills, and awkward corners are incredibly common. Learning to measure windows for curtains in these situations is what separates a good result from a great one.
The goal isn't just to cover the glass; it's about working with your home's unique character. By tweaking your approach, you can turn a challenging space into a stunning design feature. Let's break down how to handle the most frequent culprits.
Bay windows are gorgeous, but they can feel intimidating to measure. The secret is to treat each pane of glass as its own separate section. Go ahead and measure the width of each individual frame, then plan to connect them with angled curtain rod connectors for a totally seamless look.
Corner windows, where two windows meet at a 90-degree angle, follow a similar logic.
Expert Tip: For both bay and corner windows, always opt for a single, continuous curtain rod with connectors instead of multiple small rods. This creates a cohesive, professional-looking line that lets the eye glide smoothly across the space.
Arched windows add such elegance but can be a real head-scratcher when it's time for curtains. You have a couple of solid options here. You can mount a straight rod above the arch to make the window feel even taller, or you can lean into the shape with a custom-bent rod that follows the curve. For a deep dive, check out our guide on how to hang curtains on an arched window.
Sometimes, the best solution for a challenging window isn't a clever measurement trick but a look at its overall condition. Knowing when to replace windows can make future curtain installations much easier and prevent bigger headaches down the road.
Finally, let's talk about those everyday annoyances that always seem to get in the way.
By thinking through these common issues before you start, you can confidently measure any window for curtains, no matter how unconventional it might seem.
Alright, you've got your numbers and you're ready to order. This is where the magic really happens—the small details that take a project from "good enough" to truly professional. These are the little secrets seasoned installers swear by.
You know the old carpenter's saying, "measure twice, cut once"? It’s practically gospel when it comes to curtains. Before you hit that "buy" button, take five minutes to go over every single number you wrote down. It’s a simple step that can save you the massive headache of returning beautiful curtains that are just an inch too short.
Your curtain rod and brackets aren't just for show; they have a real impact on your final measurements and the way your curtains hang. A thicker rod, for instance, will push the top of the curtain slightly further from the wall, which changes the overall length you need.
Here's something people almost always forget: the curtain rod return. It's that little curved piece at the very end of the rod that turns the curtain back toward the wall. It’s not just for looks; it’s crucial for blocking that annoying sliver of light that tries to sneak in from the sides.
When you're calculating your curtain panel width, don't forget to add a few extra inches to account for this return. This is what allows the end of the panel to wrap snugly around the corner of the rod, giving you that complete, light-blocking finish.
This kind of attention to detail is a big reason why the global window curtain market is so strong, valued at around $20 billion back in 2021. Homeowners want decor that's both beautiful and functional. You can discover more insights about curtain market trends to see how these sophisticated touches are driving what people choose to buy.
One final piece of advice: always try to mount your brackets directly into wall studs. It's the most secure way. If you have to use drywall, invest in high-quality anchors that are rated to hold more than the combined weight of your rod and curtains. After all, perfectly measured curtains don't mean much if the hardware comes crashing down. By focusing on these finishing touches, you can ensure all your hard work to measure windows for curtains pays off beautifully.
Feeling good about measuring but have a couple of nagging questions? It’s completely normal. Let's tackle the most common questions we get from fellow home decorators, making sure you have all the confidence you need to get it right.
The sweet spot is 4 to 6 inches above the top of your window frame. Hanging your rod higher tricks the eye into thinking the ceilings are taller, which makes the whole room feel bigger and more open. If you have plenty of wall space, you can even go higher for a more dramatic statement. The single most common mistake is mounting the rod right on the window trim, which visually shrinks the window.
Whether curtains should touch the floor depends on your style preference and the room's function. There are three main options:
The golden rule for curtain width is the 2x fullness rule. This means the total width of your curtain panels should be at least double the width of your curtain rod. For example, a 60-inch rod requires at least 120 inches of total curtain width. This ensures your curtains have rich, beautiful folds when closed and don't look like a flat sheet. For sheer fabrics, a 3x fullness ratio is even better.
Yes, you can absolutely hang curtains without drilling. This is a great solution for renters or anyone who wants to avoid wall damage. Popular no-drill options include:
Ready to put all this knowledge to good use? At Joey'z Shopping, we have a gorgeous collection of curtains just waiting to bring your vision to life. From elegant linen curtains to room-darkening blackout panels, you’ll find the perfect match for every window in your home.