
Join the Joey'z Family!

Choosing the right drapes can feel overwhelming, but it boils down to three key elements: Function, Fabric, and Fit. The most important question to ask first is: what do you need these drapes to do? Your answer is the roadmap for how to choose drapes that you'll love for years. This guide will walk you through every step, from function to final installation.
Learning how to choose drapes is less about strict rules and more about finding what works for your lifestyle. When you start with the "why" before getting lost in colors and patterns, the process becomes much simpler.
Thinking about function first is a pro move that saves you from heartache later. Trust me, there's nothing worse than falling for gorgeous, breezy linen panels only to realize they do nothing to block that intense morning sun in your bedroom. On the flip side, heavy velvet drapes might swallow all the light in a sun-drenched breakfast nook.
Before you even glance at a fabric swatch, ask yourself this: "What problem do I need these drapes to solve?" Nail this down, and you'll instantly narrow your options.
Here are the most common jobs we ask our drapes to do:
To make this a bit easier, here’s a quick reference table that matches common household needs with the best drape features.
| Primary Goal | Recommended Fabric | Key Feature | Best For |
|---|---|---|---|
| Better Sleep | Blackout Fabric, Velvet | 100% Light Blockage | Bedrooms, Nurseries |
| Energy Savings | Thermal-Lined Cotton/Polyester | Insulating Layer | Drafty Rooms, Extreme Climates |
| Soften Sunlight | Sheer, Linen, Light Cotton | Light-Filtering Weave | Living Rooms, Kitchens, Sunrooms |
| Ultimate Privacy | Heavyweight Linen, Tightly Woven Polyester | Opaque Material | Bathrooms, Street-Facing Windows |
| Noise Reduction | Velvet, Suede, Heavy Chenille | Dense, Sound-Absorbing Fibers | Media Rooms, Home Offices, Urban Homes |
This table should help you quickly connect your main priority with the right materials and features, saving you time as you shop.
Once you’ve figured out the main job for your drapes, you can confidently move on to fabric and fit. The material you pick has a direct line to how well the drapes perform. Think of it this way: heavy velvets are the workhorses of insulation and light blocking, while airy cottons give you that casual, light-and-breezy feel. If you're new to all the terminology, taking a moment to understand the basics of what a drapery panel is can be incredibly helpful.
Insider Tip: Always, always consider the drape's "stackback." That's the amount of space the panels take up on the rod when they're pushed all the way open. A classic rookie mistake is buying a curtain rod that's too short. This forces the drapes to cover part of your window even when open, which totally defeats the purpose of having a window in the first place
The real secret that separates a high-end, professionally styled window from a standard DIY job isn’t always the price tag—it’s the measurements. Getting the fit just right can completely change how a room feels, making it seem taller, wider, and far more polished. Learning how to measure windows for drapes is a simple skill that pays off big time.
First, let's talk about width. A really common mistake is buying a drapery rod that's the exact same width as the window frame. A little designer trick is to extend the rod 8 to 12 inches beyond the frame on each side. This one tweak makes the whole setup feel grander, lets in the maximum amount of natural light when the drapes are open, and stops the window from looking squished.
Once you have your width sorted, the next big decision is the length. The way your drapes meet the floor sets the entire mood of the room. There are three classic styles to consider, and each one creates a totally different vibe.
This visual guide helps simplify the core decisions you'll make, from figuring out your drapes' purpose to ensuring they fit perfectly.

The main thing to remember is that function, fabric, and fit all work together. The purpose you have in mind will guide you to the right material, which then influences the measurements you need for a flawless look.
Even when you're being careful, a few common slip-ups can throw your project off course. Knowing what to watch for ahead of time will help you get it right on the first try and achieve that professional finish you're after.
One of the most overlooked details is stackback. This is just the amount of space your drapes take up when they’re fully open and pushed to the sides. If you don't account for it, your open drapes will end up blocking a good chunk of your window and your view. By extending your rod like we talked about earlier, you create a dedicated spot for this stackback on the wall, leaving your window fully exposed to the sun.
Another frequent error is measuring from the wrong spot. Always, always measure from where you plan to install the rod—not from the top of the window frame itself. Mounting a rod 4 to 6 inches above the frame can make a ceiling feel higher. Also, don't forget to factor in the extra height from rings or clips if you're using them. Those little inches really do matter!
Expert Insight: For tricky spots like bay or corner windows, treat each section as its own window. Measure each pane individually and look into using corner connectors for a continuous rod. This creates a seamless, elegant look that follows the room's architecture.
These might feel like small details, but they all add up to a final result that looks intentional and beautifully integrated into your home.
Once your measurements are sorted, we get to the fun part: picking the material. The fabric you choose is truly the heart and soul of your drapes. It dictates how they’ll hang, how they feel, and most importantly, how they’ll function in your everyday life. This is where your vision for the room really starts to take shape.
Understanding the personality of different fabrics is key to choosing drapes you'll love for years. Some materials are workhorses, built for insulation and privacy, while others are light and airy, designed to dance with the afternoon breeze. It’s all about finding that perfect balance of looks and practicality.

Every fabric brings its own unique texture and weight to a room. Let’s break down some of the most popular choices to help you match the material to the mood and function you’re aiming for.
We have even more details to help you decide in our guide on exploring different curtain cloth types.
Choosing the main fabric is only half the story. The lining is the crucial, hardworking element that truly elevates your drape's performance. Think of it as the backstage crew that makes the star of the show look amazing. A good lining adds body and weight, giving drapes a fuller, more structured appearance while protecting the front fabric from sun fading.
There are three main types of lining, each designed for a specific job.
Expert Insight: Never underestimate the power of a good lining. It can transform a simple cotton drape into a powerful insulator or turn a beautiful linen panel into a sleep-inducing blackout curtain. It’s a small extra investment that dramatically increases the value and function of your drapes.
The lining you pick directly impacts light control, privacy, and your home's energy efficiency. It’s the final piece of the puzzle that ensures your drapes perform exactly as you need them to.
To help you visualize the best options for your space, here's a quick comparison of the most common materials and linings we work with.
| Material/Lining | Key Benefits | Best For | Considerations |
|---|---|---|---|
| Velvet | Luxurious feel, excellent insulation, sound dampening, total light blockage. | Formal living rooms, master bedrooms, home theaters. | Heavier weight requires sturdy hardware; can attract dust. |
| Linen | Light, airy, beautiful drape, casual and organic texture. | Living rooms, dining rooms, spaces needing natural light. | Prone to wrinkling; offers minimal light control without a lining. |
| Cotton | Versatile, easy to clean, available in many weights and styles. | Kitchens, kids' rooms, casual living spaces. | Can fade in direct sunlight if unlined; lighter weights are sheer. |
| Faux Silk | Looks like real silk, durable, fade-resistant, affordable. | Bedrooms, formal dining rooms where elegance is desired. | Lacks the natural texture and breathability of real silk. |
| Standard Lining | Protects fabric, adds fullness, provides a uniform exterior look. | Almost any drape in any room for a more finished appearance. | Offers minimal light or thermal control on its own. |
| Blackout Lining | Blocks nearly all light, reduces noise, adds thermal insulation. | Bedrooms, nurseries, media rooms. | Adds significant weight and stiffness to the drape. |
| Thermal Lining | Maximizes energy efficiency, insulates against heat and cold. | Rooms with drafty windows or intense sun exposure. | Can be thicker and less flexible than other linings. |
By thoughtfully pairing a face fabric with the right lining, you can create a truly custom window treatment that perfectly balances beautiful design with high-performance function for any room in your home.
Think of your drapes as the final brushstroke on a painting—they have the power to pull everything in the room together. Once you’ve nailed down the practical stuff like measurements and linings, you can get to the fun part: choosing a style that really elevates your existing decor. This is where your personal taste gets to shine.
The first big decision is how you want to handle color. Are your drapes going to blend in quietly with the walls, or will they be a standout feature? There’s no right or wrong answer here, but each path creates a completely different mood.
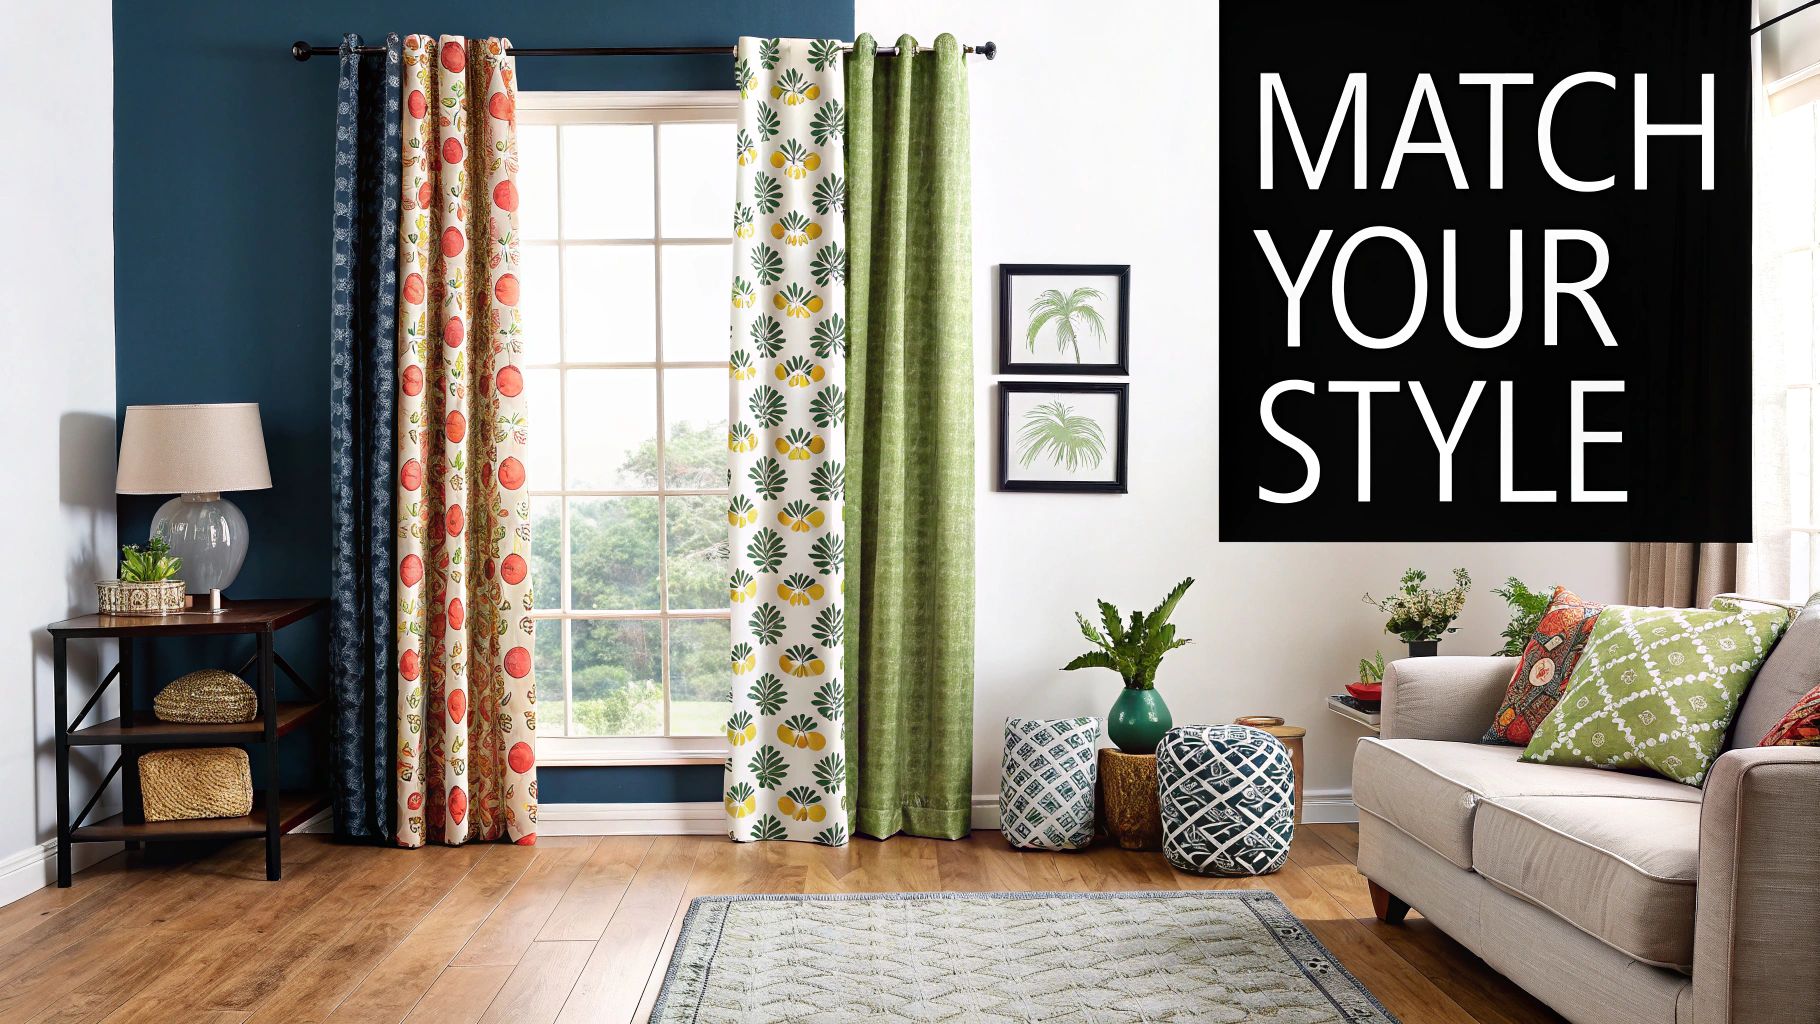
Matching your drapes to your wall color is a classic designer trick for a reason. It creates a seamless, monochromatic look that can make a room feel bigger and much more serene. This subtle approach is perfect when you want other things—like a piece of art or a vibrant rug—to be the star of the show.
On the flip side, picking a contrasting color turns your windows into a dramatic focal point. A deep navy drape against a pale gray wall, for instance, adds instant depth and a touch of sophistication. You can also pull a secondary color from another piece in your room—maybe a shade from a throw pillow or a painting—to tie everything together in a polished, intentional way.
Before you commit, it’s always a good idea to make sure the color fits your overall vision. Taking a moment for considering personal decor style for home purchases helps confirm that every new element you bring in works in harmony.
Patterns bring so much personality and movement into a space, but the key is getting the scale right. As a rule of thumb, the size of the pattern should make sense with the size of the room and what you already have in there.
Insider Tip: If you're nervous about mixing patterns, try the "rule of three." If your drapes have a large-scale pattern, pair them with a medium-scale pattern on a chair and a small-scale one on a pillow. Varying the scale is what makes the mix feel curated, not chaotic.
The very top of your drape, called the heading, has a surprisingly big impact on the overall vibe. This little detail determines how the fabric gathers and hangs, and it can instantly shift the mood from casual and relaxed to crisp and formal.
Here are a few popular styles and the look they bring to a room:
By thoughtfully combining color, pattern, and heading style, you can transform your drapes from a simple necessity into a true design feature that perfectly reflects your room's unique character.
The drapes themselves might be the star of the show, but the hardware is the essential supporting cast that makes it all work. Picking the right rod, finials, and rings is one of those final details that can take your window treatment from good to truly exceptional. This isn't just about holding up the fabric; the hardware is a key decorative element that ties the whole look together.
Your drapery hardware should feel like a natural extension of your room’s existing style. The material and finish you choose can either blend in quietly or provide a striking contrast, depending on the vibe you're going for.
Don't forget to think about the diameter of the rod, either. A thin, delicate rod is going to look out of place trying to support heavy velvet drapes, and a thick, chunky rod can easily overpower a set of airy sheers. As a general rule, a rod with a diameter of 1 to 1.5 inches is a versatile choice that works for most standard-weight drapes.
How you install your hardware is just as important as which pieces you choose. A few simple placement tricks used by interior designers can make your ceilings feel higher and your windows appear larger and more grand.
Here’s the most impactful tip I can give you: mount the rod 4 to 6 inches above the window frame. Hanging it right on top of the frame visually squashes the window. By lifting the rod, you draw the eye upward, creating an illusion of height that makes the entire room feel more spacious.
Similarly, extend the rod 8 to 12 inches beyond the window frame on each side. This is a game-changer. It allows your drapes to "stack back" against the wall when they're open, exposing the full width of the glass and letting in as much natural light as possible. This one simple adjustment prevents the drapes from blocking part of your window even when they’re pulled aside.
Pro Tip: For exceptionally heavy drapes, like floor-to-ceiling velvet with a blackout lining, you absolutely need to add a center support bracket to your rod. This prevents the rod from bowing in the middle over time, ensuring your drapes hang beautifully and function smoothly for years to come.
Beyond your standard rods, some specialized hardware can solve unique challenges and add a layer of convenience.
For wide sliding glass doors or large picture windows, a traverse rod is an excellent choice. This system uses internal clips that glide along a track, allowing you to open and close heavy, wide drapes with a simple cord or wand. It's a lifesaver for big windows.
For hard-to-reach windows or for a touch of smart-home luxury, motorized systems are becoming a go-to option. These can be controlled with a remote or even a smartphone app, making them perfect for those tall windows in a foyer or the ones hidden behind a sofa. And if you have children or pets, always prioritize safety by choosing cordless hardware.
Even after sorting through fabrics and styles, a few questions always seem to pop up. Let's tackle the most common ones we hear from homeowners to ensure you feel confident in your choices.
For a professional look that creates the illusion of taller ceilings, you should mount the drapery rod 4 to 6 inches above the window frame. If you have very high ceilings, you can go even higher to enhance the sense of drama and scale. Avoid mounting the rod directly on the window frame, as this can make the room feel shorter.
The short answer is yes, they generally should. The exact length depends on the style you want:
While the terms are often used interchangeably, there is a technical difference. Drapes are typically made of heavier, thicker fabric, are almost always lined, and are designed for formal settings to block light and provide insulation. Curtains are generally lighter, unlined, and made from more casual fabrics like cotton or sheers, offering a softer look with less light control.
A good rule of thumb is that the total width of your drape panels should be at least two times the width of your window. This fullness creates rich, beautiful folds when the drapes are closed. For an even more luxurious, opulent feel, you can go up to three times the window's width. Skimping on width is a common mistake that results in a flat, skimpy look.
Ready to put all this knowledge to use and find the perfect window treatments for your home? At Joey'z Shopping, we offer a wide range of beautiful, high-quality drapes to fit any style and need. Explore our collection today and bring your vision to life.