
Join the Joey'z Family!

So, you're ready to upgrade your windows with beautiful Roman blinds. Fantastic choice! But before you fall in love with a fabric, the first and most critical step is learning how to measure for Roman blinds correctly. Your initial decision is simple: will they hang inside the window frame or outside it? This single choice dictates how you measure and is the key to achieving that perfect, professional-looking finish.
Getting the measurements right is the foundation of a great window treatment. It all starts with choosing between an inside mount and an outside mount. This decision sets the stage for an installation that can transform your space, making it look either seamlessly built-in or bold and dramatic.
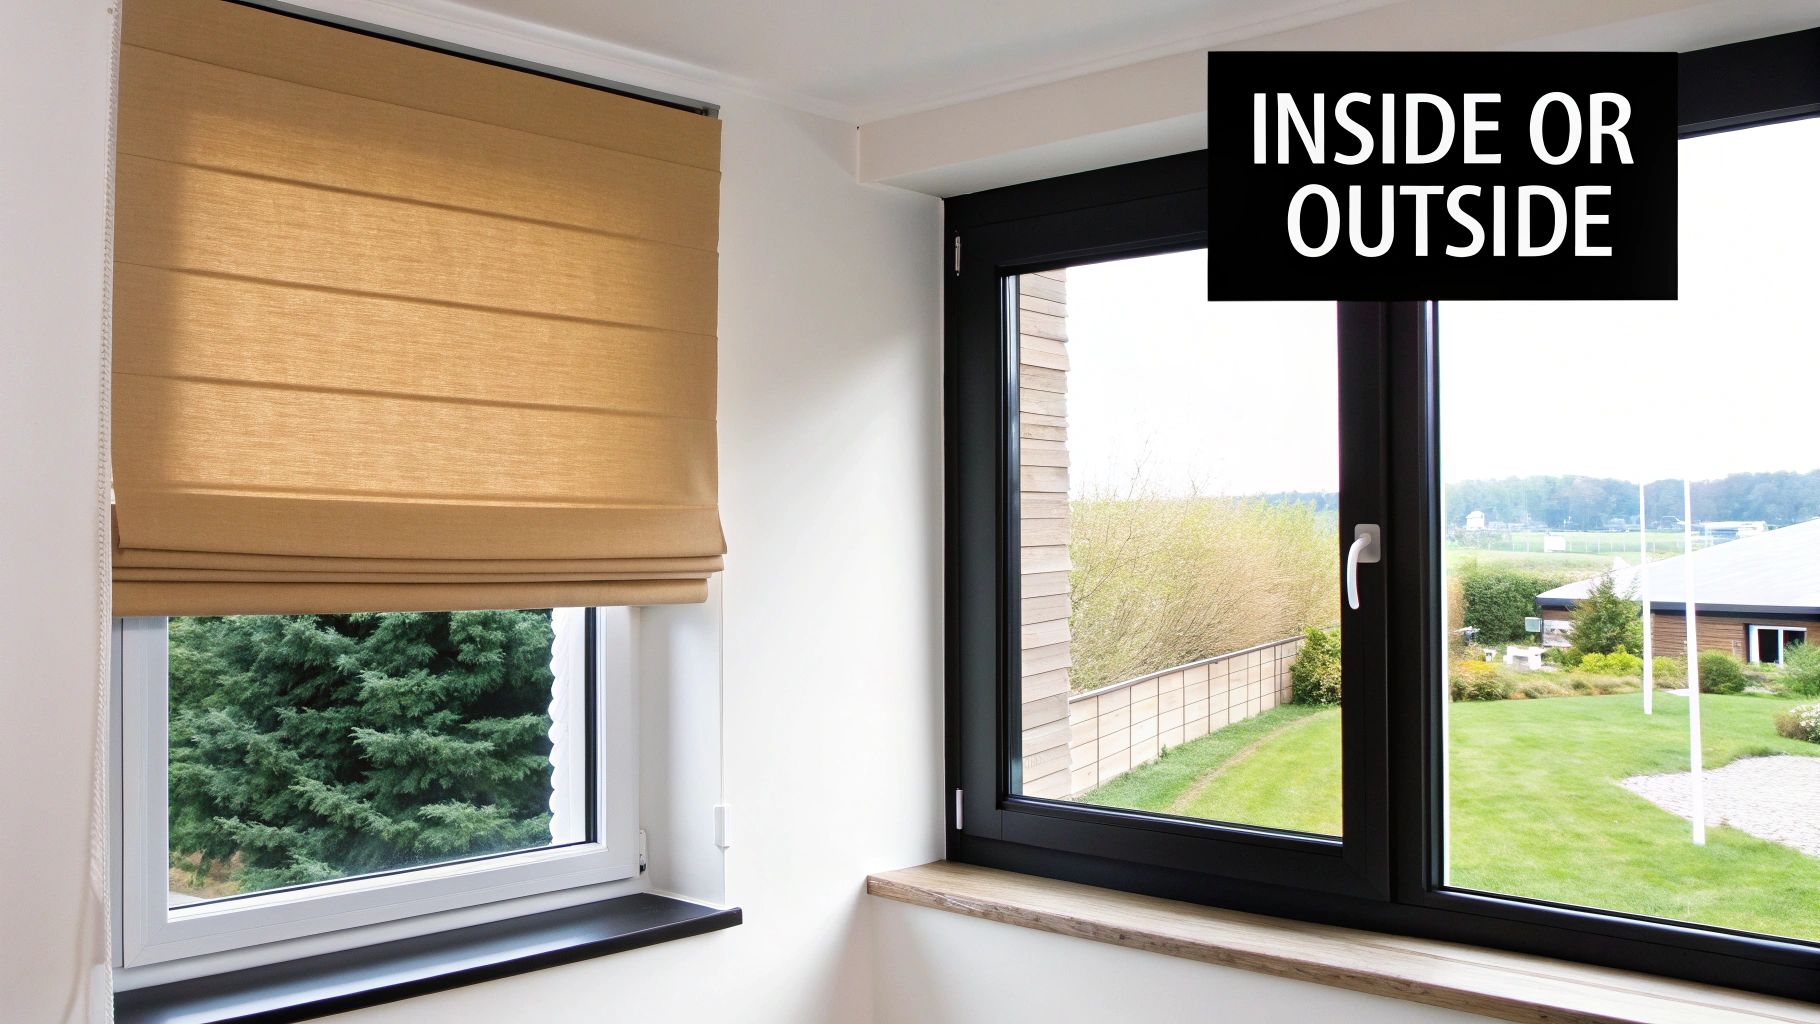
An inside mount offers a clean, custom-built aesthetic. The blind fits neatly within the window's recess, which is ideal for showcasing decorative window trim or maintaining a minimalist vibe.
Here’s why you might love an inside mount:
With an outside mount, the blind is installed on the wall or trim above and wider than the frame. This method is a fantastic problem-solver. It can hide less-than-perfect window frames, make a window appear larger, and is the best option for maximizing light blockage.
Just like measuring for blinds, understanding the basic tips for precise measurements in home projects is a skill that pays off for any home enhancement.
The right measurements are more than just numbers; they are the difference between a frustrating DIY project and a stunning home upgrade. Choosing your mount style first prevents costly mistakes and ensures you love the final result.
Did you know that getting your measurements right the first time can save you up to 30% on returns and alterations? In the global Roman blinds market, valued at around USD 2.5 billion in 2023, precision is everything.
If you're feeling adventurous and thinking about crafting your own window treatments, our guide on how to make a Roman shade is packed with valuable insights to get you started.
Still on the fence? This quick comparison should help you decide which installation method is right for your windows and your style.
| Feature | Inside Mount | Outside Mount |
|---|---|---|
| Aesthetic | Clean, minimalist, built-in look | Dramatic, makes windows look larger, creates a focal point |
| Best For | Showcasing decorative window trim, minimalist decor | Hiding imperfect frames, maximizing light control & privacy |
| Light Control | Allows small light gaps on the sides | Offers superior light blockage by overlapping the frame |
| Space Consideration | Doesn't project into the room, ideal for small spaces | Requires wall space above and around the window |
| Measurement | Requires precise measurements of the window's interior | More forgiving; measurements are based on desired coverage |
Ultimately, your choice depends on the look you want to achieve and the specific characteristics of your windows. Both can look fantastic when done right.
Before ordering those beautiful Roman blinds, let's talk tools. Getting the right gear together now is the secret to a smooth, stress-free process. It's a non-negotiable step for getting measurements you can trust.
The single most important tool in your kit will be a sturdy, steel tape measure. I can't stress this enough. A fabric tape measure can stretch, but a steel one gives you unwavering accuracy. This isn't a tiny detail; it's the foundation of a perfect fit.
You only need a couple of other simple items. Having them on hand before you start will save you from scrambling mid-measurement.
One of the most overlooked—and critical—steps is checking your window's recess depth. This is the distance from the front edge of your window frame back to the glass or any obstruction. For an inside-mounted blind, you need enough room for it to sit flush.
Pro Tip: For most of our inside-mount Roman blinds, you'll want a minimum recess depth of about 1 inch for a flush, clean fit. Always double-check the specific product page for exact requirements.
Skipping this check is a top reason installations go wrong. Industry reports show that a staggering 40% of measurement errors stem from ignoring frame details or using the wrong tools. For instance, a fabric tape measure can stretch by 5-10%, leading to huge inaccuracies. If you're curious about market trends, Grand View Research has some great insights.
By gathering this simple toolkit, you’re setting yourself up for success. You’re not just taking numbers; you’re ensuring your new window treatments will look absolutely perfect.
An inside mount gives your Roman blinds that clean, custom-built look, fitting them snugly inside the window frame. It's the perfect way to show off beautiful window molding. Getting the measurements right for an inside mount is all about precision.
The core principle is simple: measure everything three times. I can't stress this enough. Window frames, especially in older homes, are rarely perfectly square. Measuring at multiple points ensures your new blind won't be too tight in one spot and too loose in another.

To measure the width, grab your steel tape measure and check the distance across the inside of the window frame in three spots:
Once you have these three numbers, circle the narrowest one. This is the single most important measurement for your width. Using the smallest dimension guarantees the blind will operate smoothly without catching. For a deeper look, check our guide on how to measure windows for blinds.
The process for measuring height follows the same logic. You'll be measuring the vertical distance from the top of the inside of the window frame down to the windowsill.
Take these three height measurements:
Again, find the shortest of these three measurements and write it down as your official height. This keeps the blind from bunching up on the windowsill when fully lowered.
Insider Tip: Don't round your numbers up! It’s tempting to add a little "just in case," but with inside mounts, precision is everything. Always record the exact measurement down to the nearest 1/8 of an inch.
Here’s a detail that often surprises first-timers: you don't need to subtract anything from your final numbers. When you order an inside-mount Roman blind and give us your narrowest width, the factory automatically makes a small deduction, usually about 1/4 inch to 1/2 inch.
This isn't a mistake; it's a crucial part of the process. This slight reduction provides the clearance needed for the blind to move up and down freely within the frame without friction. Your job is to provide the exact, true measurements—we handle the rest.
An outside mount is your secret weapon to make a window feel grander, hide an unattractive frame, or get the best light control. The blind is installed on the wall or trim above and around the window, resulting in a dramatic, polished look.
One of the best things about an outside mount is that it's more forgiving. You don't need millimeter-perfect precision, but you do need to determine how much you want the blind to overlap the window opening to stop light leaks and ensure privacy.
A good rule of thumb is to add at least 2 to 3 inches of extra width on each side of the window frame. So, if your window frame is 36 inches across, you'll order a blind that's between 40 and 42 inches wide. This overlap is what blocks light from creeping in around the edges.
For the height, measure from the top of the window frame to the bottom sill and add at least 3 to 4 inches. This extra length ensures the blind completely covers the window and provides space for mounting the hardware above the frame.
Now, here’s a critical detail that trips up many DIYers: you must account for the blind's stack height. This is the space the fabric takes up at the top when the blind is fully raised. If you mount the headrail too low, this fabric stack can block your view and natural light.
To get it right, plan to install the mounting brackets about 2 inches above the top of the frame. This elevation ensures that when you pull up the blind, the stack sits neatly above the glass, leaving your view completely clear.
Mastering stack height is crucial, as miscalculations are responsible for an estimated 35% of all redo orders. This precision is vital in a market where custom fits have been shown to reduce material waste by 18%.
Sometimes, an outside mount isn't just a style choice—it's your only practical option.
You'll need an outside mount if:
Even the most careful person can make a few common mistakes when measuring for Roman blinds. The good news is these slip-ups are easy to avoid once you know what to watch for. Think of this as a final check-in before you place your order.
One of the easiest mistakes is simply mixing up width and height. It sounds basic, but it’s surprisingly common to jot down 36" W x 48" H as 48" W x 36" H. My pro tip? Always label your numbers with a "W" and an "H" the second you write them down.
Another classic hang-up is forgetting to check for things that might get in the way. Before committing to your inside mount measurements, run your hands along the inside of the window frame.
Keep an eye out for these usual suspects:
If you spot any of these, an outside mount is often the simplest solution. It allows your cordless Roman blinds to glide up and down without a hitch.
A great measurement isn't just about the window's dimensions; it's about the window's environment. Taking a moment to spot potential obstacles saves you from the disappointment of a blind that can't function properly.
Feeling unsure about your numbers? This guide can help you spot and fix common issues before they become big problems.
| Problem | Likely Cause | Solution |
|---|---|---|
| Inside mount is too wide. | You recorded the widest measurement. | Remeasure width at the top, middle, and bottom. Use the narrowest of the three measurements for your order. |
| Outside mount looks too small. | Not enough overlap was added. | Add at least 2 to 3 inches to each side of your window frame measurement for better coverage and light control. |
| The blind hits a crank handle. | The mounting depth is too shallow. | Check the product's minimum depth requirement. If it's not deep enough, switch to an outside mount. |
| Blinds in a corner collide. | Headrail depth wasn't accounted for. | One blind's measurement needs to account for the projection of the other. Consider a "side return" option if available. |
Not all windows are perfect rectangles. Unique shapes need a slightly different approach.
French Doors: Treat each glass panel as its own window. An outside mount is almost always best. Measure the width and height of the glass, then add at least 1-2 inches of overlap on all four sides.
Bay and Corner Windows: These can be a measurement puzzle. For bay windows, measure each section individually. For corner windows where two blinds will meet, you must account for the depth of the headrails to avoid them crashing into each other.
By anticipating these issues, you can measure with confidence. Taking time to double-check for tricky angles and obstructions is the final step in making sure your investment in new window treatments pays off beautifully.
No, you do not. This is the most common question we get. Your job is to provide the exact, true measurement of the window opening at its narrowest point. Our factory will automatically take a small, precise deduction (usually 1/4" to 1/2") to ensure the blind operates smoothly without scraping the frame.
For an outside mount, a good rule of thumb is to add 2 to 3 inches of width to each side of the window frame. For height, add an extra 3 to 4 inches above the frame. This blocks light leaks and makes the window appear larger and more finished.
Don't worry, most aren't! This is why you should always measure the width and height in three different places for an inside mount. By providing the narrowest width and shortest height, you guarantee the blind will fit. If a window is significantly out-of-square (more than a 1/2" difference), an outside mount is the best solution as it can hide the imperfection.
Even if your windows look identical, you must measure each one individually. It's very common for "identical" window frames to have slight variations. Some studies show that up to 15% of windows in the same house have small but meaningful dimensional differences. Measuring each one prevents costly ordering mistakes.
Ready to put those flawless measurements to good use? The expert team at Joey'z Shopping is here to help you find the Roman blinds that will truly complete your space. Come explore our stunning collection and bring your vision to life.
https://joeyzshopping.com