
Join the Joey'z Family!

The secret to a magazine-worthy room isn't splurging on expensive drapes—it's knowing the correct way to hang curtains. If you learn one thing today, make it this: always go high and wide. This single technique is a game-changer, instantly making any room feel taller, brighter, and more polished.
Hanging curtains is one of the easiest ways to transform a space, but getting the placement wrong can make a room feel smaller and darker. This guide will walk you through every step, from measuring perfectly to choosing the right hardware, ensuring a professional finish that elevates your entire home.
Have you ever hung new curtains, stepped back, and felt… underwhelmed? It’s a common frustration. You've picked the perfect fabric, but the final result lacks that professional touch you see in design photos.
The issue is rarely the curtains; it's their placement. When hung too low and too narrow, curtains visually shrink your windows, block precious natural light, and can even make your ceilings feel lower.
Luckily, mastering how to hang curtains transforms them from simple window coverings into a major design feature. Proper placement can dramatically improve natural light, create an illusion of height, and even help with your home's energy efficiency. It’s one of the most impactful DIY upgrades you can make.
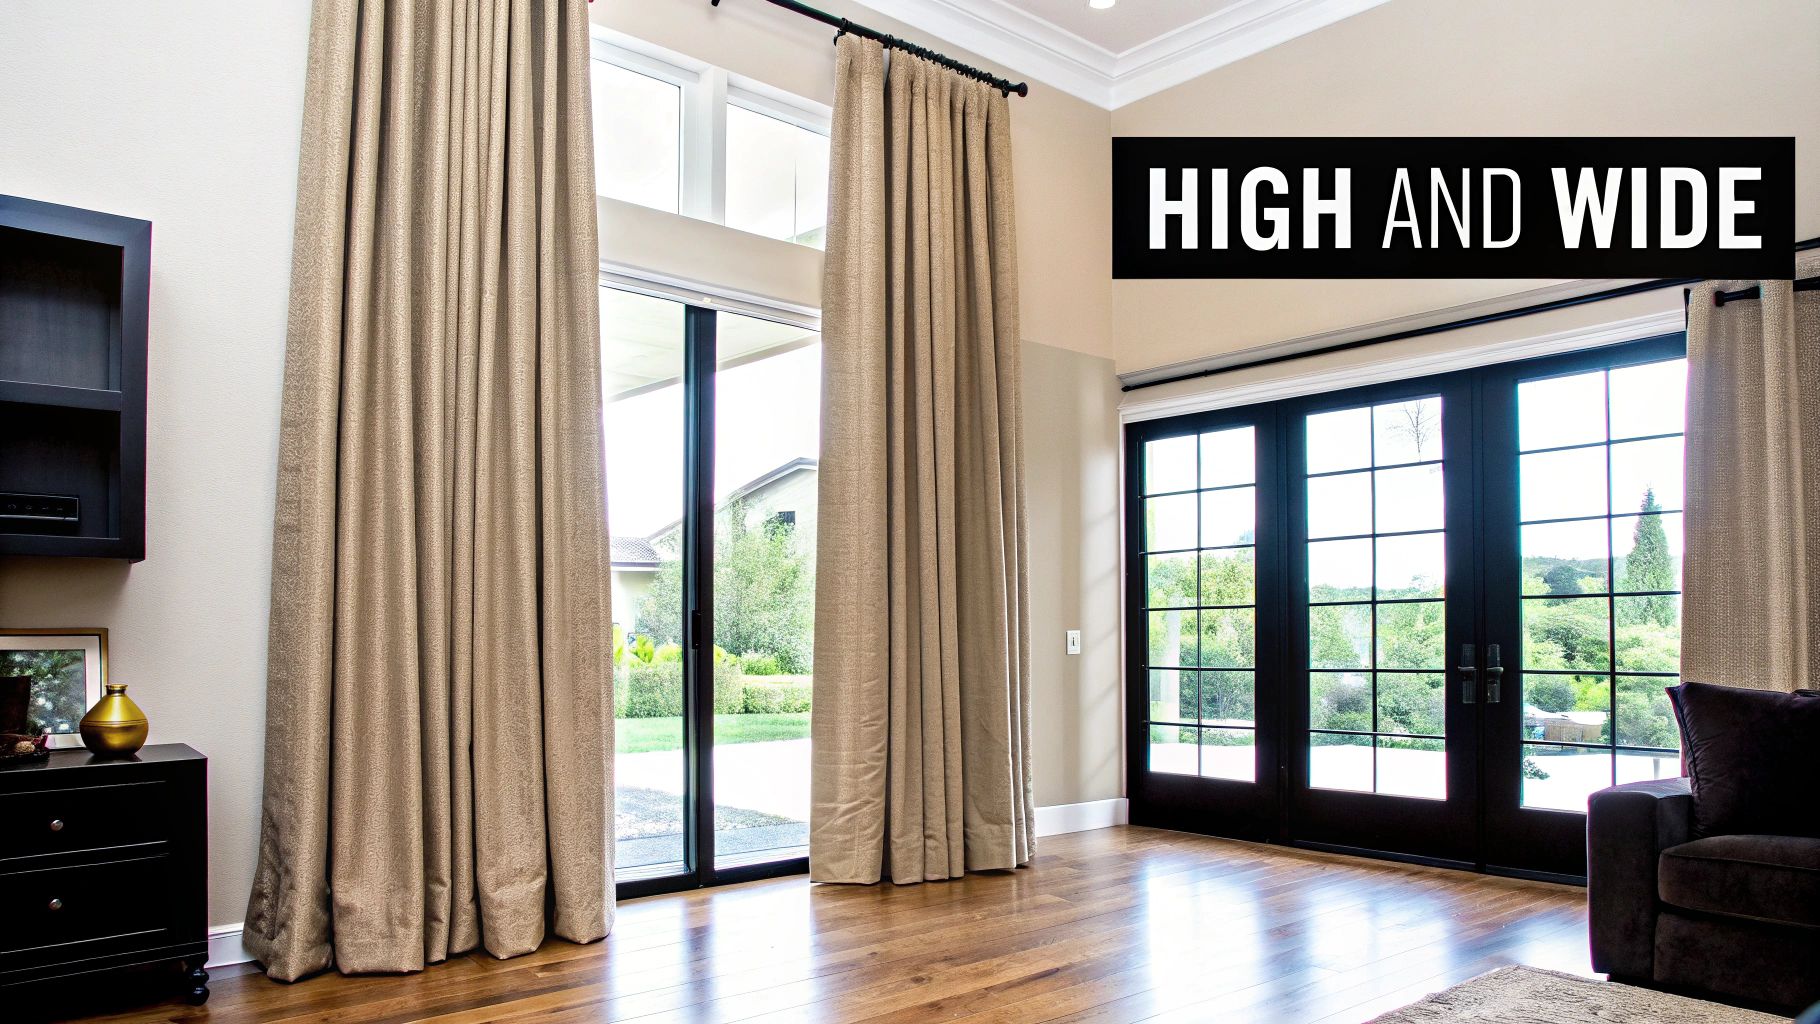
The advantages go beyond aesthetics. When you hang curtains wider than the window frame, they can be pulled back completely, allowing the maximum amount of sunlight to flood the room. This not only brightens your space but can reduce your reliance on artificial lighting.
This is also where thermal curtains truly shine. When installed correctly, they provide a significant insulating barrier. In fact, according to the U.S. Department of Energy, well-fitted thermal curtains can reduce winter heat loss by up to 25%. The key is positioning the rod 4–6 inches above the window and 6–12 inches beyond each side to create an effective seal against drafts.
Expert Insight: The biggest mistake I see is people hanging the rod right on the window frame. Lifting that rod lifts the eye, making your ceilings look higher and the whole room feel more open and grand.
Window treatments are a fundamental part of interior design that anchors your decor. Getting this detail right sets the stage for everything else in the room.
To see the bigger picture, learning how to plan room layout is a crucial step in any design project, and you'll find that window treatments play a central role. By following the simple "high and wide" principles, you can achieve a cohesive, intentional, and beautifully finished space.
This simple framework is your key to transforming your windows from an afterthought into a stunning focal point.
| Principle | Standard Measurement | Visual Impact |
|---|---|---|
| Hang High | Mount the rod 4-6 inches above the top of the window frame. | Creates an illusion of height, making ceilings feel taller. |
| Hang Wide | Extend the rod 6-12 inches beyond the window frame on each side. | Makes windows appear larger and allows maximum natural light when open. |
| Go Long | Choose curtains that "kiss" the floor or puddle slightly. | Adds a touch of elegance and completes the elongated look. |
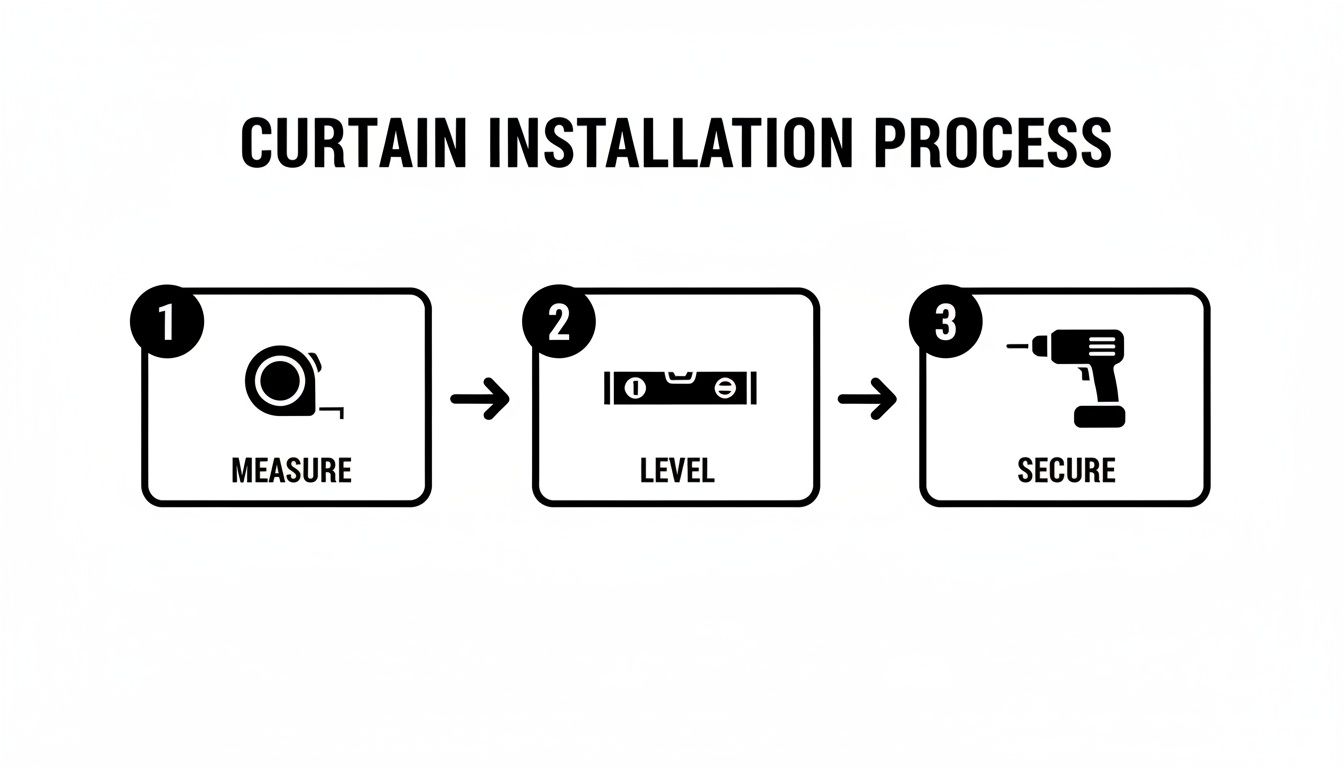
Great results start with great preparation. Before you drill a single hole, gathering the right tools will save you from that dreaded mid-project trip to the hardware store. Think of this as your pre-flight checklist for a smooth installation.
Having the right equipment on hand is the difference between a frustrating afternoon and flawlessly hung curtains. You'll work faster and end up with a much more professional result.
These tools are non-negotiable for getting the job done right. They are the foundation for the correct way to hang curtains, ensuring every measurement is spot-on and every bracket is secure.
Insider Tip: When marking drill spots, use a small 'X'. This gives you a precise target to aim for, which is key to getting brackets perfectly aligned on both sides of the window.
These are the items people often forget until it’s too late. They elevate your installation from "good enough" to "professionally done."
A stud finder is your secret weapon for a rock-solid installation. Screwing brackets directly into the wooden studs behind your drywall provides the most secure anchor possible, which is especially important for heavier drapes like our thermal blackout curtains.
What if there's no stud where you need to drill? This is where wall anchors become essential. A screw directly into drywall won’t hold. An anchor expands behind the wall, creating a secure grip that can support your curtains.
Which anchor should you use?
Don’t let wrinkled fabric ruin your hard work. Most curtains come with creases from the packaging.
Take a few extra minutes to either steam or iron them on a low-heat setting before you hang them. This small step makes a huge difference, ensuring your curtains drape beautifully from the start.
Getting your measurements right is the single most important step. It’s the difference between a custom, high-end look and one that feels just a little off. We’ll make this process foolproof by breaking down how to measure for rod height, width, and curtain length.
The secret from professional designers? Always go "high and wide." This simple concept creates a powerful illusion, making your windows—and the entire room—feel larger and more grand.
Let’s start with width. A common mistake is buying a curtain rod that’s the exact width of the window frame. This forces the curtains to block part of the glass even when fully open, limiting light.
The solution is to go wider. Here's a simple formula:
Window Frame Width + 8 to 24 inches = Your Ideal Rod Width
This means extending the rod at least 4 to 12 inches on each side of the window frame. For a 36-inch window, you’d look for a rod that is 44 to 60 inches wide. This allows the panels to be pulled back completely, exposing the entire window.
Next up is height. Placing your rod too close to the window frame can make ceilings feel lower. The goal is to draw the eye upward, creating an illusion of vertical space.
The general rule is to mount the rod 4 to 6 inches above the top of the window frame. If you have tall ceilings (9 feet or higher), you can go even higher, sometimes placing the rod halfway between the frame and the ceiling for a dramatic effect.
Once you've marked your rod's ideal height and width, you can determine the correct curtain length. This measurement dramatically influences the style and feel of your room.
For more detailed guidance, see our complete guide to window curtain measurements.
This table breaks down the three primary length options to help you find the perfect fit.
| Length Style | Description | Best For |
|---|---|---|
| The Float | Curtains hang about an inch above the floor. | High-traffic areas, kitchens, or homes with kids and pets. Practical and easy to clean around. |
| The Kiss | The hem just grazes the floor, barely touching it. | A clean, tailored, and modern look. It requires precise measurement for a sharp, custom appearance. |
| The Puddle | Curtains extend onto the floor by an extra 2 to 6 inches. | A romantic, luxurious, or traditional feel. Works beautifully with heavy fabrics like velvet or linen. |
Not all windows are simple rectangles. Here’s how to approach common tricky situations:
Think of your curtain rod and hardware as the jewelry for your windows. They're more than functional pieces; they're the finishing touch that supports your curtains and pulls your room's aesthetic together. This is a crucial step in learning the correct way to hang curtains.
The curtain rods market is expected to grow significantly, highlighting how critical the right hardware is for both style and function.
Before drilling, pick the right rod. Your choice will impact the look and daily use of your curtains. Are they purely decorative, or will you open and close them every day?
Here’s a quick rundown of common rod types:
The rod's material also contributes to your room's vibe. Wrought iron can feel rustic or industrial, while sleek brass or nickel feels more modern. Classic wood rods bring a warm, traditional feel that works with almost any decor.
Once you have your hardware, it's time for installation. Precision is key to avoiding a sagging rod or crooked curtains.
First, use a stud finder to locate wall studs. Anchoring brackets into solid wood framing provides maximum stability, which is essential for heavy drapes or extra-wide windows.
After marking stud locations (or where you'll place anchors), mark your drill spots. Use your measurements—4 to 6 inches above the frame and 4 to 12 inches wider on each side. Use your level to draw a faint pencil line connecting the bracket locations to ensure a perfectly horizontal rod.
Pro Tip: Before you drill, double-check that your pencil marks are perfectly level. A tiny error now becomes an obvious slant later. Hold the level against your marks one last time to be sure.
If you can't drill into a stud, using the right wall anchors is non-negotiable. For plaster walls, use self-drilling metal anchors to prevent crumbling. For standard drywall, winged plastic anchors offer a strong grip.
Drill pilot holes for your anchors or screws. Gently tap the anchors into the holes until they sit flush with the wall. Now, attach the brackets, screwing them firmly into the anchors or studs.
Once the brackets are solid, place your curtain rod into them and tighten any set screws to lock it in place. For a more detailed walkthrough, check out our guide on how to install curtain rods.
Not all curtains are made the same, and the header—the very top part—defines its personality and how it hangs. Getting this detail right is a huge part of the correct way to hang curtains. Let’s walk through the most common styles for a professional drape every time.
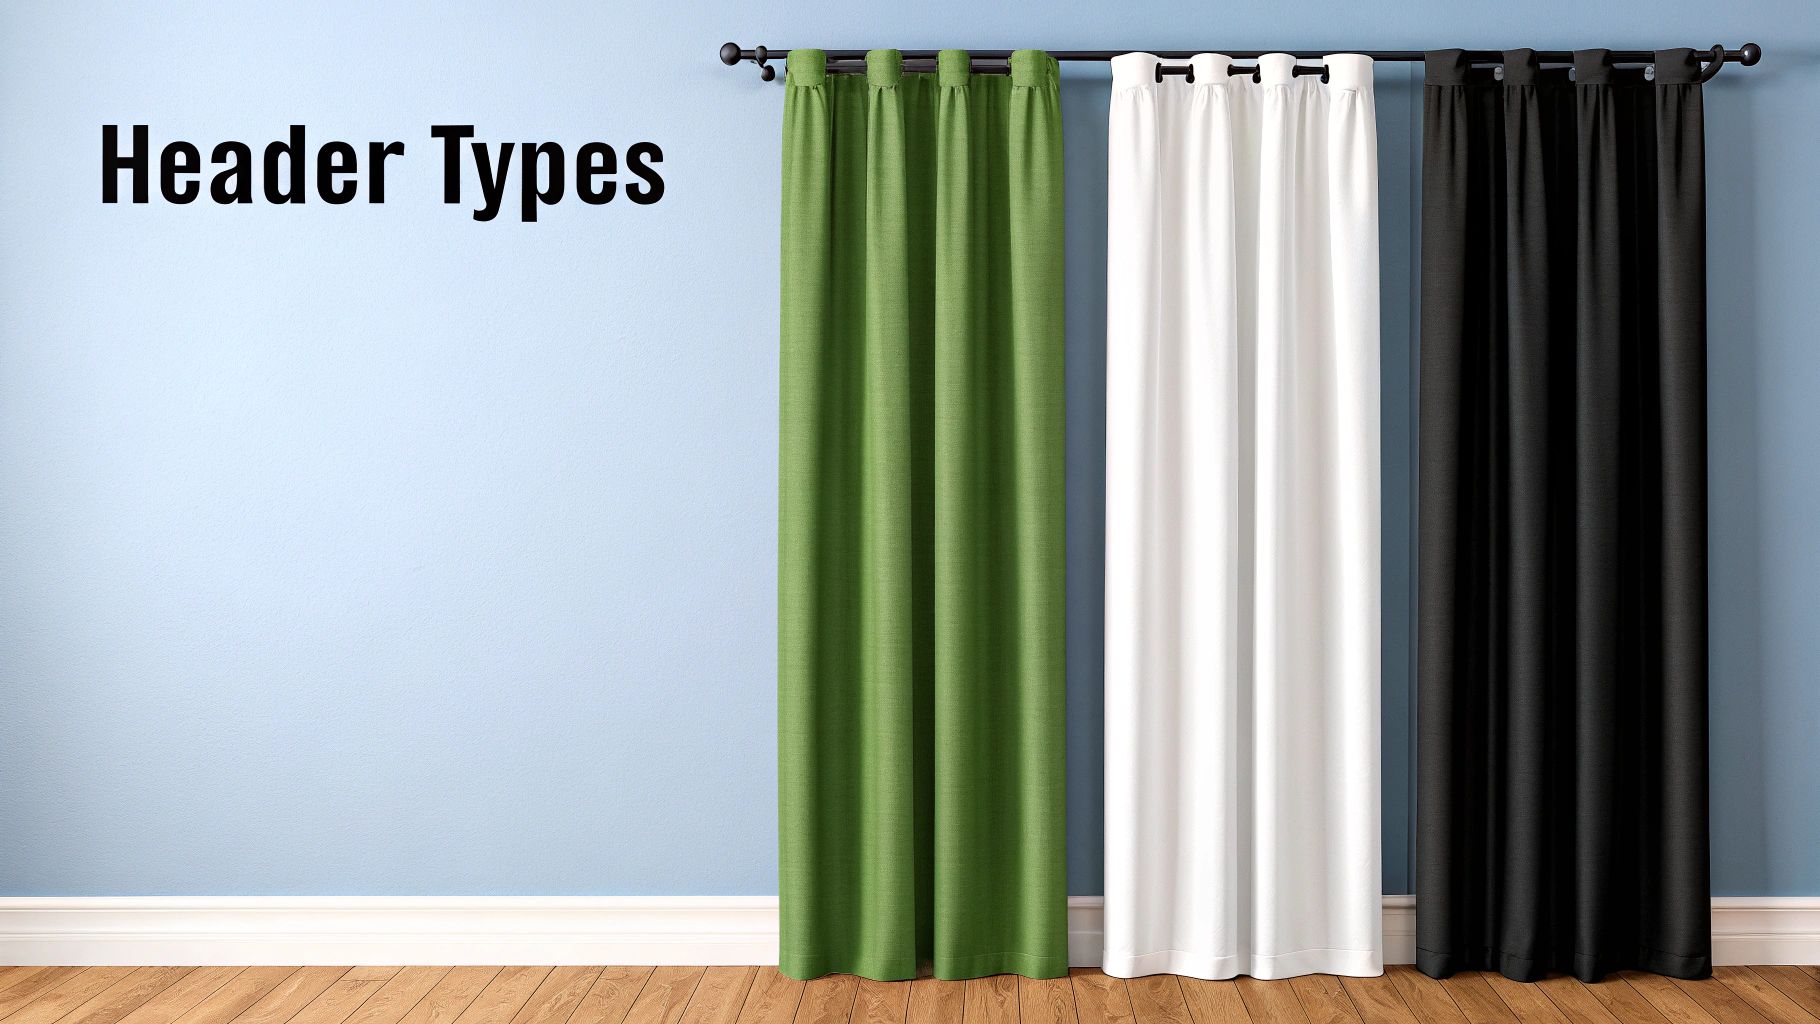
Grommet (or eyelet) curtains are a modern favorite. The large metal rings make them simple to thread onto a rod, and they naturally fall into deep, even waves.
To hang them, slide the rod through the grommets. The trick is in the folding: ensure the curtain folds like an accordion, with the front of the panel facing into the room at both ends. This keeps the waves consistent.
Pro Tip: Once grommet curtains are up, manually arrange the folds. Adjust each wave so they are evenly spaced and hang straight. This tiny step has a massive visual impact.
Rod-pocket curtains offer a classic, gathered look. The fabric has a channel sewn into the top for the rod to slide through, creating a soft, shirred effect.
The secret to making rod-pocket panels look great is fullness. You'll need panels that are at least 1.5 to 2 times the width of your window, or they can look flat.
Back-tab curtains have hidden loops on the back, creating a tailored, pleated look that appears custom-made. Just thread the rod through these hidden tabs.
Tab-top curtains have visible loops of fabric at the top, offering a more casual, cottage-like feel. When hanging, make sure all tabs face the same direction and are spaced evenly for balance.
Clip rings are a fantastic way to add style and function to almost any curtain panel. They let curtains glide smoothly along the rod, making them a practical choice for windows you use daily.
To get the best result, spacing is everything.
This precise spacing creates soft, even folds that look sophisticated. For more inspiration, explore various curtain hanging styles to elevate your room.
The short answer is they should hang to the floor for the most polished, elongating effect. This draws the eye upward and makes ceilings feel taller.
There are three popular floor-length styles:
Yes, you absolutely can, which is great for renters. The most common no-drill solution is a tension rod, which fits inside the window frame. For hanging outside the frame, high-quality adhesive hooks from brands like Command can work. Always check the weight limit on the package to ensure they can support your rod and curtains.
To get that rich, gathered look, the rule of thumb is to choose curtain panels with a combined width that is 1.5 to 3 times the width of your window. For a standard, classic look, aim for double the width. If your window is 40 inches wide, you would want a total curtain width of at least 80 inches (e.g., two 40-inch panels).
Hanging on tricky surfaces just requires the right hardware. For brittle plaster walls, use self-drilling metal anchors that cut cleanly and provide a strong grip. For concrete or brick, you'll need a hammer drill with a masonry bit to create the hole, then use anchors specifically designed for concrete to secure your brackets.
Ready to put your new skills to the test? Explore the beautiful and affordable collections at Joey'z Shopping. Find your perfect style and create the home you love.